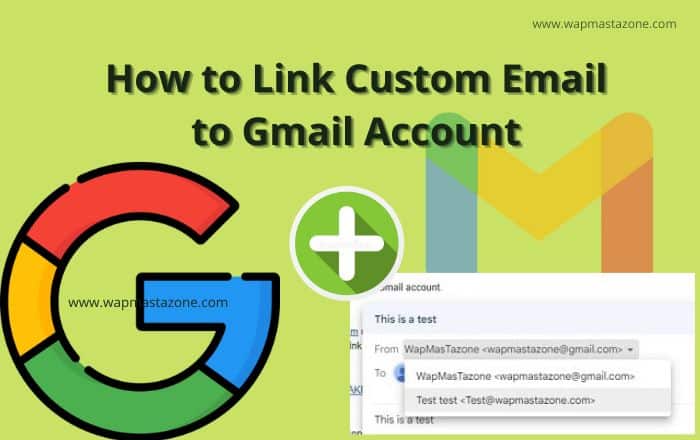
Have you ever thought of linking your custom domain email address to your Gmail account? If yes, this guide will help you understand to do it for free.
can I use Gmail with my custom domain name? Yes, it is possible.
What is a custom domain email? a custom domain email is an email connected to your domain that you use to send and receive emails. e.g info@wapmastazone.com or admin@exmaple.com
some of its advantages include that you won’t have to log in to a custom email account every time you want to use it to send an email. Linking it to a Gmail account gives you direct access.
For this to be successful, you will need to log in to your hosting account to acquire all information needed. The connection to Gmail will be established using the free SMTP/POP3 credentials.
Discover: Top Affiliate Programs to Join and Start Earning
You can easily switch between the email you want to use from your Gmail account once you have successful link your custom domain email to your Gmail account.
For the purpose of this tutorial, some of the images used below are taken from Hostgator account. The same also applies to other domain registrars like Bluehost, Godaddy, Hostinger, Namecheap, and so on since they all have a similar interface.
In case you don’t have a custom domain yet, you can follow any of the links above to get your hosting account and free domain name. To compare the hosting registrar differences, please check the link below.
Recommended: Best Web hosting registrar
How to Link and Use Custom Domain with Gmail
To begin the connection;
1. Setup Custom Email Address in your Hosting Account
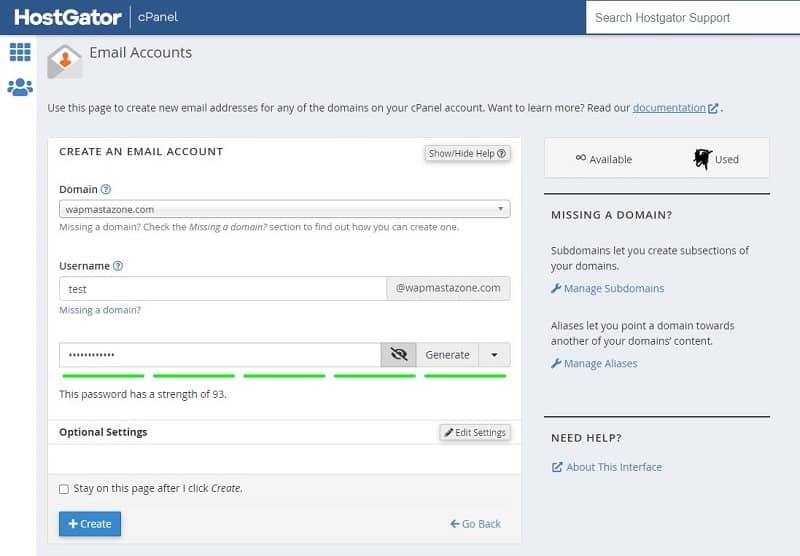
To set up a custom email;
- login to your hosting account and locate “Email Account”
- then set up a new custom email and password.
- copy the password and email and save somewhere for later use
- for the purpose of this tutorial, we set up “test@wapmastazone.com” as a user email
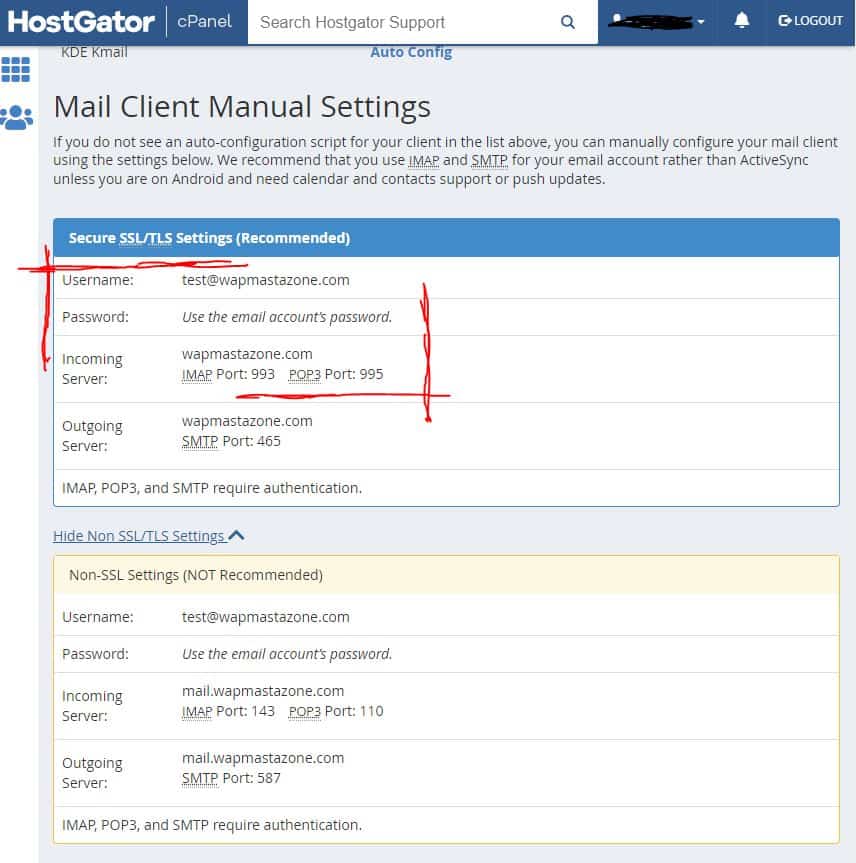
- Once done, click on “connect devices” to go to “Mail Client Setup” page
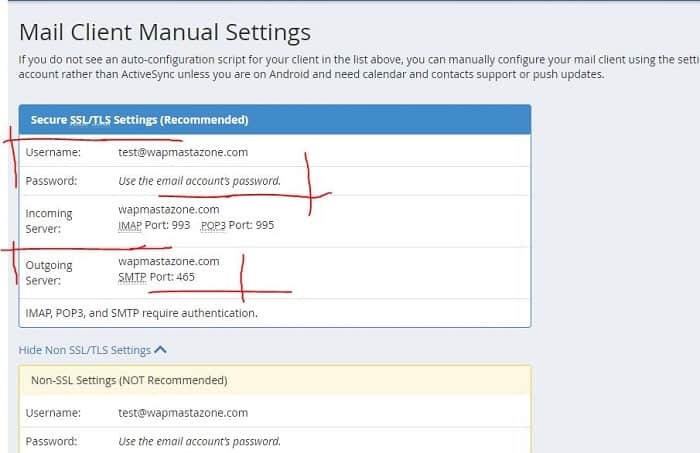
- from the mail client setup page, you will get all the other details required in order to allow Gmail to send and receive emails using POP3. You can see the information needed in the image below.
Please consult your hosting provider or controller in case you don’t have access to the above feature.
Also read: How to Choose a Good Web Hosting for your Website or Business
2. Create a Free Gmail Account
To begin the process, log in to your Gmail account or first create a free Gmail account if you don’t have any. e.g yourname@gmail.com. Also, know that every mail you received in the linked email and Gmail will be displayed and listed all together within your Gmail account.
3. Setup Connection in Gmail Account – Allow Gmail to receive emails using POP3
- login to your Gmail account
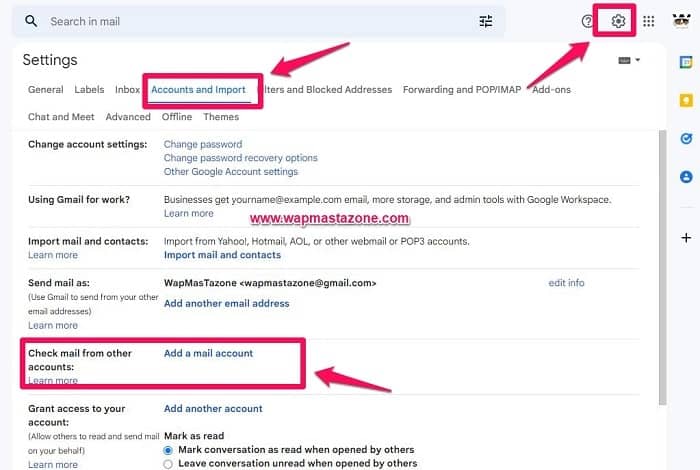
- then click on the “Settings” icon as you can see in the image below
- then click on “See all settings”
- locate and click on “Accounts and Import” tab.
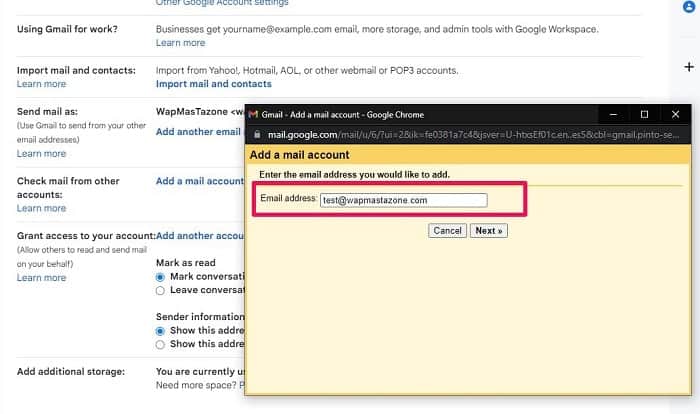
- locate “Check mail from other accounts” settings then, click Add a mail account.
- a popup window will come up which contains a few steps.
- In the first step, enter your custom email address you created earlier (for this tutorial, we created “test@wapmastazone.com)
- then click “Next“
Also read: 8 Most Popular Databases for Web Development
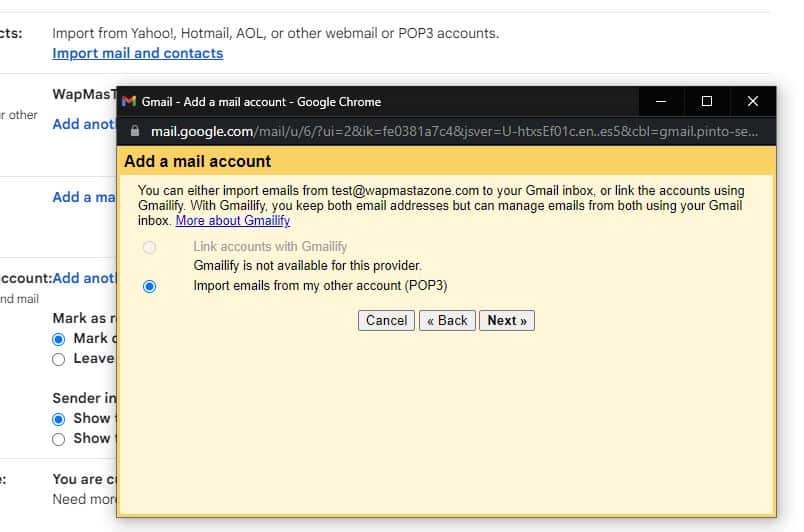
- Now select “Import emails from my other account (POP3)” in the next step as you can see in the image below
Also read: 9 Most Deadliest Computer Viruses that Stood the Test of Time
- Locate the User information you saved earlier then fill in the username and password
- you can see the POP incoming server details from the first step,
- copy the details and fill in the next step with POP server (mail.wapmastazone.com) and port number (995)
- Check the “Leave a copy of retrieved….” box
- Check the “Always use a secure connection (SSL)…” box
- I recommend checking the “label incoming messages….”, so that you can easily identify the emails for your custom domain from your google mail.
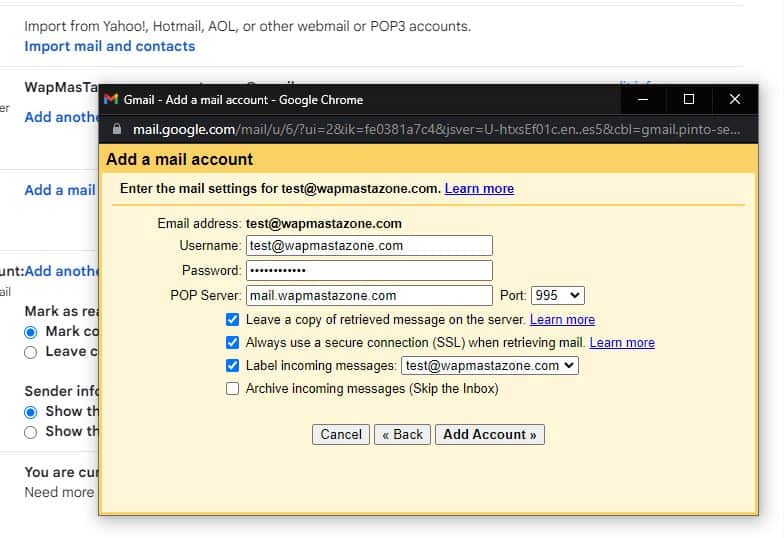
- then click “Add Account” to complete the process
Also read: 6 Reasons Why you Should buy a Custom Domain
4. Allow Gmail to send emails using SMTP
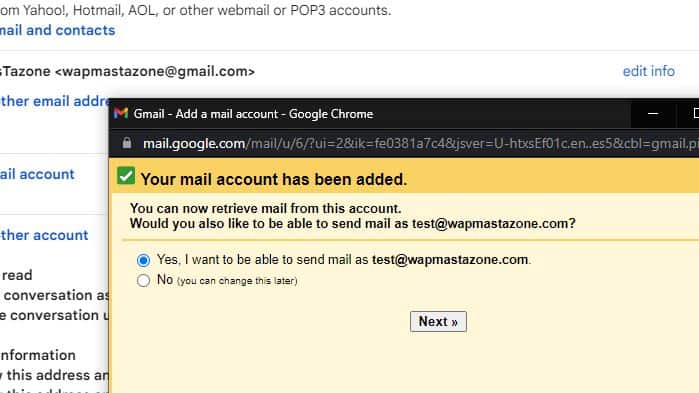
Now that you have allowed Gmail to receive emails using POP3, you will be able to receive new emails in your custom domain via Gmail.
However, we need to allow Gmail to send emails using SMTP Before you will be able to send new emails from your custom email using Gmail. To do this, follow the steps below;
- First, find the outgoing server mail client details from your housing account from step 1. This will be used to connect your SMTP server in Gmail.
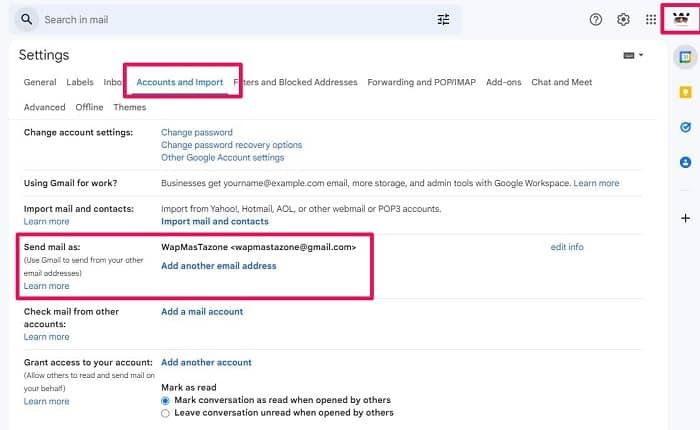
- Now, Go back to the Accounts and Import area in your Gmail account’s settings.
- locate and click on “Accounts and Import” tab within your Gmail account
- locate the “Send mail as:” setting.
- then click on “Add another email address” as you can see in the image below
[ads1]
Also Read: What Search Engine did People Use before Google?
- a pop window will then come up
- now enter Name ( this can be your own name if the email is your personal email address)
- then enter the custom email address
- check the box for “Treat as an alias” as you can see in the image below
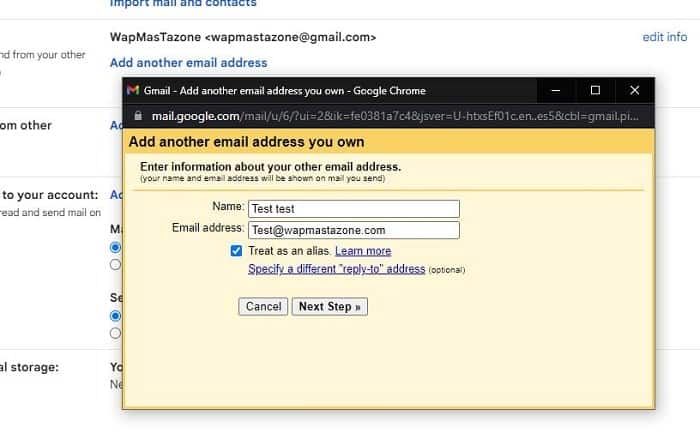
- then click “Next Step”
- in the next step, enter the SMTP Server (this may be “wapmastazone.com” or “mail.wapmastazone.com”, depending on what you have in your hosting mail client details)
- then enter Port (465) from your email host.
- enter the Username (test@wapmastazone.com)
- enter the Password for the custom domain email you earlier created
- then choose “Secured connection using SSL (recommended)”
[ads1]
Also read: 6 Password Safety Tips you Should Never Ignore
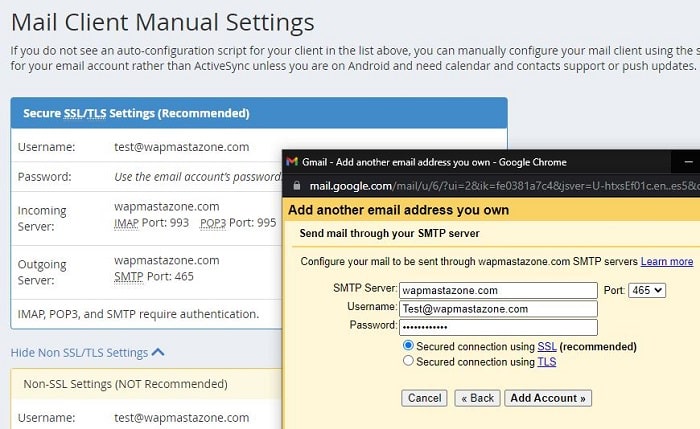
- then click “Add Account”
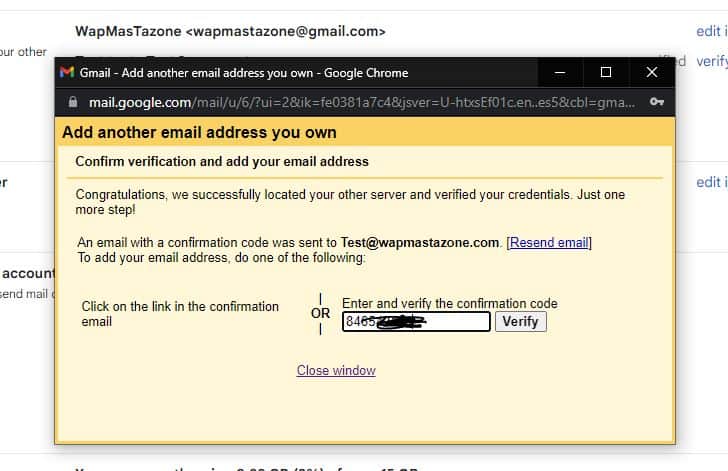
- In the next step, Gmail will then automatically send a confirmation code to your custom email address
- login to your hosting email account through your hosting account to get the code
- then use the code to verify and complete the linking process or you can directly click on the link in your custom email to complete the verification.
Also read: 15 Best Free VPN for Android, iPhone and Computer Users
[ads1]
5. Check Custom Domain Email Linkage
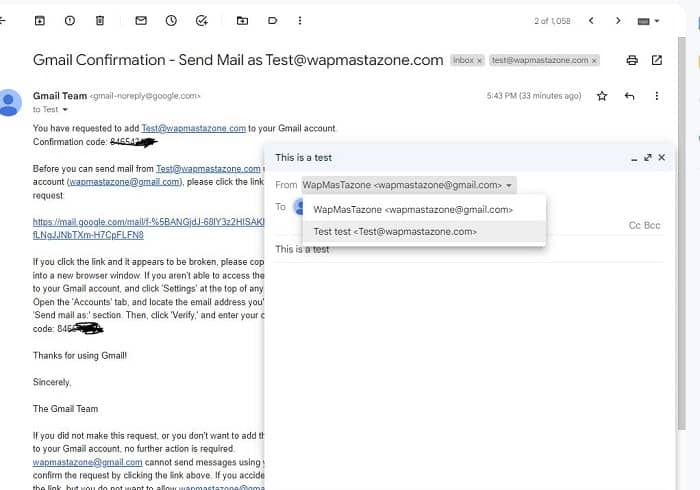
The custom domain email is now successful and you should be able to send and receive emails within your Gmail account. To check this or perform a test;
- login to your Gmail account
- then click on “compose”
- now, you can change the sender’s email to your custom domain email by clicking on the “From” tab as you can see in the image below.
- That’s all, you have completed the process
Maybe it is helpful to note that you may sometime experience delays in receiving messages. Take for instance. when a mail is sent to your custom email account, it gets to your custom email account first before showing up in your Gmail account.
Also Read: 10 Signs of a Malware Infection on your Computer
Do you find this guide useful?, let us know in the comment section
[ads1]
Recommended:
Namecheap Shared Hosting – Buy your shared hosting plan on Namecheap here
Namecheap VPS Hosting – Buy your VPS Hosting plan on Namecheap here
Free domain name and Shared Hosting – Buy your Free domain name and Share Hosting on Namecheap
Godaddy domain name – Buy affordable domain name on Godaddy
Godaddy domain name – 50% OFF your hosting on Godaddy- Buy Here
Namecheap domains – Buy affordable domain name on Namecheap
Interserver VPS hosting – Buy your VPS Hosting plan on Interserver here
Host your website on Hostinger + Free domain – Buy Hosting plan on Hostinger here
Namesilo domain name – Buy a Cheap Domain name on Namesilo
OVHcloud VPS Hosting – Buy your VPS plan on OVHcloud here
OVHcloud dedicated Hosting – Buy your dedicated Hosting plan on OVHcloud here
